Set up the workload environment
The following sections describe various steps to set up the environment for your workload. For example, install anaconda, create a conda environment for a specific workload, install jupyter notebook server, etc.
Load additional tools and libraries via module
In AiMOS environment, the available tools are not in your PATH by default. If you need additional development tool and libraries, you can use module to display what is available and load the required tools and libraries for your development and testing.
List the complete list of available modules and extenstions, use module spider. For example:
 [BMHRkmkh@dcsfen01]$ module spider

 -----------------------------------------------------------------------------------------------------------------------------------
 The following is a list of the modules and extensions currently available:
 -----------------------------------------------------------------------------------------------------------------------------------
  automake: automake/1.16.1
    Automake

  bazel: bazel/0.17.2/1, bazel/0.18.1/1, bazel/0.18.0/1, bazel/0.21.0/1
    Bazel build system

  ccache: ccache/3.5/1
    ccache compiler cache

  clang: clang/7.0.0/1
    LLVM + clang

  cmake: cmake/3.17.2
    CMake

  cuda: cuda/10.1, cuda/10.2
    NVIDIA CUDA

  fftw: fftw/3.3.8/1
    FFTW

  gcc: gcc/6.4.0/1, gcc/6.5.0/1, gcc/7.4.0/1, gcc/8.1.0/1, gcc/8.2.0/1, gcc/8.4.0/1
    GNU Compiler Collection (gcc)

  git: git/2.25.1
    git

  hdf5: hdf5/1.10.3/1
    HDF5

  hwloc: hwloc/2.0.2/1
    hwloc
--More--
For example, you want to load cmake module and spectrum_mpi module
(base) [your-id@dcsfen01 ~]$ module load  cmake/3.14.6
(base) [your-id@dcsfen01 ~]$ which cmake
alias cmake='cmake3'
        /usr/bin/cmake3
(base) [your-id@dcsfen01 ~]$ which cmake3
/usr/bin/cmake3
(base) [your-id@dcsfen01 ~]$ module load spectrum-mpi
(base) [your-id@dcsfen01 ~]$ which mpirun
/opt/ibm/spectrum_mpi/bin/mpirun
For more information see https://docs.cci.rpi.edu/examples/Modules/
Install Anaconda
Anaconda is not installed by default on AiMOS at the system level. If you need the conda environment for your workload, you will need to install and set it up in your environment.
Prerequisites
You must login to one of the front end nodes. Please note that you need to use the appropriate front end node depending on the hardware architecture. For more information see Login to AiMOS
Proxy was set up. For how to see Initial Environment Setup.
Download the Anaconda or Miniconda3 installer applicable for the hardware architecture, i.e. ppc64le for DCS cluster or X86_64 for NPL cluster, as needed. For example:
DCS Cluster:
wget https://repo.anaconda.com/miniconda/Miniconda3-latest-Linux-ppc64le.sh
NPL Cluster:
wget https://repo.anaconda.com/miniconda/Miniconda3-latest-Linux-x86_64.sh
For more information see https://docs.cci.rpi.edu/software/Conda/
IMPORTANT NOTE: the same GPFS filesystem is mounted on all the nodes in both DCS(Power) and NPL(X86) cluster. You need to consider that if you include conda init in your ~/.bashrc as well as the .condarc. You do not want things intended to run on Power running on X86 or vice versa. You may want to refer to Conda Init in .bashrc for example of setting up .bashrc to run the appropriate conda init for the environment.
This following example is to install the ppc64le miniconda environment to the scratch directory.
[BMHRkmkh@dcsfen01 ~]$ bash Miniconda3-latest-Linux-ppc64le.sh -p ~/scratch/miniconda3

Welcome to Miniconda3 4.7.12

In order to continue the installation process, please review the license agreement.
Please, press ENTER to continue
>>>
...
Do you accept the license terms? [yes|no]
[no] >>> yes

Miniconda3 will now be installed into this location:
/gpfs/u/home/BMHR/BMHRkmkh/scratch/miniconda3

  - Press ENTER to confirm the location
  - Press CTRL-C to abort the installation
  - Or specify a different location below

[/gpfs/u/home/BMHR/BMHRkmkh/scratch/miniconda3] >>>
PREFIX=/gpfs/u/home/BMHR/BMHRkmkh/scratch/miniconda3
Unpacking payload ...
Collecting package metadata (current_repodata.json): done
Solving environment: done

## Package Plan ##

  environment location: /gpfs/u/home/BMHR/BMHRkmkh/scratch/miniconda3

  added / updated specs:
    - _libgcc_mutex==0.1=main
    - asn1crypto==1.2.0=py37_0
    - ca-certificates==2019.10.16=0
...
  yaml               pkgs/main/linux-ppc64le::yaml-0.1.7-h1bed415_2
  zlib               pkgs/main/linux-ppc64le::zlib-1.2.11-h7b6447c_3


Preparing transaction: done
Executing transaction: done
installation finished.
Do you wish the installer to initialize Miniconda3
by running conda init? [yes|no]
[no] >>> yes
no change     /gpfs/u/home/BMHR/BMHRkmkh/scratch/miniconda3/condabin/conda
no change     /gpfs/u/home/BMHR/BMHRkmkh/scratch/miniconda3/bin/conda
no change     /gpfs/u/home/BMHR/BMHRkmkh/scratch/miniconda3/bin/conda-env
no change     /gpfs/u/home/BMHR/BMHRkmkh/scratch/miniconda3/bin/activate
no change     /gpfs/u/home/BMHR/BMHRkmkh/scratch/miniconda3/bin/deactivate
no change     /gpfs/u/home/BMHR/BMHRkmkh/scratch/miniconda3/etc/profile.d/conda.sh
no change     /gpfs/u/home/BMHR/BMHRkmkh/scratch/miniconda3/etc/fish/conf.d/conda.fish
no change     /gpfs/u/home/BMHR/BMHRkmkh/scratch/miniconda3/shell/condabin/Conda.psm1
no change     /gpfs/u/home/BMHR/BMHRkmkh/scratch/miniconda3/shell/condabin/conda-hook.ps1
no change     /gpfs/u/home/BMHR/BMHRkmkh/scratch/miniconda3/lib/python3.7/site-packages/xontrib/conda.xsh
no change     /gpfs/u/home/BMHR/BMHRkmkh/scratch/miniconda3/etc/profile.d/conda.csh
modified      /gpfs/u/home/BMHR/BMHRkmkh/.bashrc

==> For changes to take effect, close and re-open your current shell. <==

If you'd prefer that conda's base environment not be activated on startup,
   set the auto_activate_base parameter to false:

conda config --set auto_activate_base false

Thank you for installing Miniconda3!
[your-id@dcsfen01 ~]$
[your-id@dcsfen01 ~]$ source .bashrc
(base) [your-idh@dcsfen01 ~]$
Now you have the base conda installed and activated in your environment.
Frequently Used conda commands
Display conda information
conda info
List the available conda environments
conda info --env
Activate an environment.
conda activate <env name>
Deactivate a current environment
conda deactivate
List the packages installed in a conda environment
conda list
List all available packages in the channels
conda search
Remove a package in a conda environment
conda remove <package name>
Install a package in a conda environment
conda install <package name>
Install a pip package in a conda environment
pip install <package name>
For more information see Conda cheatsheet at https://docs.conda.io/projects/conda/en/latest/_downloads/843d9e0198f2a193a3484886fa28163c/conda-cheatsheet.pdf
Create a new conda environment for your workload
It is strongly recommended that you create a separate environment for your workload than the default base environment which comes with the installation of Anaconda.
For example that you want to create an environment named pytorch-env and install pytorch on to environment.
conda create -n pytorch-env pytorch
NOTE: you can specify additional packages in the command line. You can also specify a specific version for the packages.
Install WML-CE (a.k.a PowerAI)
Watson Machine Learning Community Edition (WML-CE), formerly PowerAI, is a free, enterprise-grade software distribution that combines popular open source deep learning frameworks, efficient AI development tools, and accelerated IBM® Power Systems™ servers to take your deep learning projects to the next level.
For more information, see https://developer.ibm.com/linuxonpower/deep-learning-powerai/releases/
Prerequisites
Log in to one of the front end nodes. For more information see Login to AiMOS
Make sure that you set up the proxy before you proceed to the next step. For how to see Initial Environment Setup.
Anaconda is installed and activated. For more information see Install Anaconda
Set up ~/.condarc if needed. If ~/.condarc does not exist, you can run the following command to generate it:
conda config
Below is the example of .condarc file. You need replace your-project with your PROJECT ID and <your-id> with your ID.
channels:
  - https://public.dhe.ibm.com/ibmdl/export/pub/software/server/ibm-ai/conda
  - powerai
  - defaults
  - conda-forge
As a best practice, you should install WML-CE in a new conda environment (i.e. not the base environment). That would enable you to have different versions of WML-CE.
IMPORTANT: You also need to specify the python version since the only valid Python versions with WML CE are Python 3.6 and 3.7.
For more information on how to install WML-CE, see https://www.ibm.com/support/knowledgecenter/SS5SF7_1.7.0/navigation/wmlce_install.htm
As an example, here are the steps for creating a new conda environment named wmlce-1.7.0 with python version 3.7.
For automatically accept the license after the installation:
export IBM_POWERAI_LICENSE_ACCEPT=yes
Create a new environment named “wmlce-1.7.0” with python version is set at 3.7.
conda create --name wmlce-1.7.0 python=3.7
Activate the created conda environment.
conda activate wmlce-1.7.0
Install WML-CE version 1.7.0 which is the latest version at the time of this writting.
To install the whole powerai GPU packages in the created conda environment, run:
conda install powerai
To install the whole powerai GPU packages version 1.6.2
conda install powerai=1.6.2
To install an individual framework, such as pytorch or tensorflow.
For complete list of individual framework see https://www.ibm.com/support/knowledgecenter/SS5SF7_1.7.0/navigation/wmlce_install.htm
conda install pytorch
Or
conda install tensorflow-gpu
To install powerai CPU packages only in the created conda environment, run:
conda install powerai-cpu
To install RAPIDS packages, run:
conda install powerai-rapids
Install Open-CE
Open Cognitive Environment(Open-CE) provides the latest and greatest AI package and framework versions pre-integrated in an easy-to-consume and use Conda environment. The main Open-CE GitHub page focusses on providing feedstock to developers, and groups, such as Open Source Lab (OSL). The Center for Genome Research and Biocomputing (CGRB) at the Oregon State University provides precompiled Conda packages 1. This install section are consolidated from both reference below 2 3.
This repository contains a collection of Open-CE files that can be used to create a conda channel. The conda channel will contain packages for every feedstock listed within the Open-CE files. Different variants of Python and CUDA can be specified at build time. Open-CE currently supports the following:
Open-CE Release 1.2.2
Release date: 06/16/2021
What’s new
This is release 1.2.2 of Open Cognitive Environment (Open-CE). This is bug fix 2 of release 1.2 of Open Cognitive Environment (Open-CE), code named Prairiedog.
Bug Fix Changes
libgcc and libstdc++ were pinned to cos6 versions to allow for compilation with GCC 7.2/7.3 #433
TensorFlow was updated to version 2.4.2
Dependency pins were loosened for networkx, requests, scipy and werkzeug #439
Changed PyArrow to build with -O2 optimizations to avoid a compiler error in GCC 7.x
Add patch to PyArrow to fix handling of decimal types with negative scale in C data import
Installing the Open-CE Repository and Frameworks
Setting up the software repository
The Open-CE MLDL packages are distributed as conda packages in an online conda repository. Conda must be configured to give priority to installing packages from this channel.
Add the Open-CE channel to the conda configuration by running the following command:
conda config --prepend channels https://ftp.osuosl.org/pub/open-ce/current/
Creating conda environments (recommended)
With conda, you can create environments that have different versions of Python or packages installed in them. Conda environments are optional but recommended. If not used, packages are installed in the default environment called base, which often has a higher risk of containing conflicting packages or dependencies. Switching between environments is called activating the environment.
The syntax to create and activate a conda environment is:
conda create --name <environment name> python=<python version>
conda activate <environment name>
Note: It is recommended that you specify the Python version when creating a new environment. If you do not specify the version, Python 3.7 is installed when any package that requires Python are installed.
The only valid Python versions with Open-CE are Python 3.6, 3.7 and 3.8.
For example, to create an environment named opence_env with Python 3.7:
conda create --name opence_env python=3.7
conda activate opence_env
For more information on what you can do with conda environment see https://conda.io/projects/conda/en/latest/user-guide/tasks/manage-environments.html.
Note: Open-CE should be run as a non-privileged user and not root. The Open-CE components are designed to be usable by normal users, and the pre-installed docker images provide a non-root user by default. Some of the Open-CE components will give warnings or will fail when run as root. Installing frameworks individually
Install MLDL Frameworks Individually. The framework packages (Open-CE 1.2.2) include the following versions.
Package |
Version |
ppc64le |
x86_64 |
|---|---|---|---|
tensorflow |
2.4.2 |
X |
X |
tensorflow-estimator* |
2.4.0 |
X |
X |
tensorflow-probability |
0.12.1 |
X |
X |
tensorboard |
2.4.1 |
X |
X |
tensorflow-text |
2.4.1 |
X |
X |
tensorflow-model-optimization* |
0.5.0 |
X |
X |
tensorflow-addons |
0.12.1 |
X |
X |
Tensorflow-datasets |
4.1.0 |
X |
X |
tensorflow-hub |
0.10.0 |
X |
X |
tensorflow-metadata |
0.26.0 |
X |
X |
pytorch |
1.7.1 |
X |
X |
torchtext |
0.8.1 |
X |
X |
torchvision |
0.8.2 |
X |
X |
pytorch-lightning |
1.1.0 |
X |
X |
pyTorch-lightning-bolts |
0.2.5 |
X |
X |
onnx |
1.7 |
X |
X |
onnxruntime* |
1.7.2 |
X |
X |
keras2onnx |
1.7.0 |
X |
X |
skl2onnx |
0.9.0 |
X |
X |
tf2onnx |
1.8.5 |
X |
X |
onnxmltools |
1.8.0 |
X |
X |
onnxconverter-common |
1.8.1 |
X |
X |
xgboost |
1.3.3 |
X |
X |
transformers |
3.5.1 |
X |
X |
tokenizers |
0.9.3 |
X |
X |
sentencepiece |
0.1.91 |
X |
X |
spacy |
2.3.4 |
X |
X |
thinc |
7.4.1 |
X |
X |
dali* |
0.28.0 |
X |
X |
opencv |
3.4.10 |
X |
X |
horovod |
0.21.0 |
X |
X |
lightgbm |
3.1.1 |
X |
X |
pyarrow |
3.0.0 |
X |
X |
grpc-cpp |
1.29.1 |
X |
X |
Note, there were type errors in original document
– * Tensorflow-estimators -> tensorflow-estimator
– * Tensorflow-model-optimizations -> tensorflow-model-optimization
– * Tensorflow-estimators -> tensorflow-estimators
– * Onnx-runtime -> onnx-runtime
– * Grpc -> grpc
– * Dali had some build issues on ppc. Disabled in v1.3 and v1.4, will be renable in v1.5.
With the conda environment activated, run the following command:
conda install <package name>
Uninstalling the Open-CE MLDL frameworks
Find information about uninstalling machine learning and deep learning MLDL frameworks.
The MLDL framework packages can be uninstalled individually, or you can uninstall all of the MLDL packages at the same time.
If the frameworks are installed into a separate conda environment, all of the frameworks can be removed by simply deleting the environment:
conda env remove -n <environment name>
Individual frameworks (and any packages that depend on them) can be removed by removing the individual package:
conda remove <package name>
Important: This command removes the specified packages and any packages that depend on any of the specified packages. If you want to skip this dependency checking and remove just the requested packages, add the –force option. However, this may break your environment, so use this option with caution.
Install Jupyter notebook
The Jupyter Notebook is an open-source web application. It allows you to create and execute notebook documents that contain code, visualizations and text. For more information see https://jupyter.org/
It is recommended to install Jupyter notebook in a miniconda environment which includes a minimal Python and conda installation.
Prerequisites
You are logging in to one of the front end nodes. For more information see Login to AiMOS
Proxy was set up. For how to see Initial Environment Setup.
Conda is installed and activated. For more information see Install Anaconda.
You can install Jupyter notebook via conda install or pip install.
If you plan to use the AI framework with your notebook, make sure that you install Jupyter notebook in the conda environment that includes the AI framework. For example, if you want to use the AI frameworks that are included in the WML-CE, then you need to install Jupyter notebook in the environment that WML-CE was installed. For more information on how to install WML-CE see ref:install-wmlce.
conda install -c conda-forge notebook
Or
pip install notebook
The example below is to install jupyter notebook on the wmlce-1.7.0 environment where you have installed WML-CE 1.7.0 as above.
(base) [your-id@dcsfen01 wmlce-1.7.0]$ conda install -c conda-forge notebook
Collecting package metadata (current_repodata.json): done
Solving environment: done

## Package Plan ##

  environment location: /gpfs/u/home/BMHR/BMHRkmkh/scratch/miniconda3

  added / updated specs:
    - notebook


The following packages will be downloaded:

    package                    |            build
Verify the notebook was installed.
(base) [your-id@dcsfen01 wmlce-1.7.0]$ conda list | grep notebook
notebook                  6.0.3                    py37_0    conda-forge
Start Jupyter Notebook
Prerequisites:
You are logging in to one of the front end nodes. For more information see Login to AiMOS
Conda was installed and activated. For more information see Install Anaconda.
Jupyter notebook was installed. For how to see Install Jupyter notebook.
Allocate a compute node
For example, allocate a compute node for 30 minutes:
salloc -N 1 --gres=gpu:1 -t 30
After the command returns, you can run squeue to find the allocated node.
squeue
       JOBID PARTITION     NAME     USER ST       TIME  NODES NODELIST(REASON)
      387824       dcs     bash BMHRkmkh  R       1:29      1 dcs123
Start Jupyter Notebook on the allocated compute node
SSH to the compute node
(base) [BMHRkmkh@dcsfen01 ~]$ ssh dcs123
Warning: Permanently added 'dcs123,172.31.236.123' (ECDSA) to the list of known hosts.
Activate to the conda environment that is appropriated for your notebook.
(base) [BMHRkmkh@dcs123 ~]$ conda activate wmlce-1.7.0
(wmlce-1.7.0) [BMHRkmkh@dcs123 ~]$
Start Jupyter Notebook and set the notebook directory to the barn directory. NOTE: you need to specify the absolute path for the notebook-dir.
(wmlce-1.7.0) [BMHRkmkh@dcs123 ~]$ jupyter notebook --ip=0.0.0.0 --no-browser --notebook-dir=/gpfs/u/home/BMHR/BMHRkmkh/barn
[I 10:37:36.643 NotebookApp] Serving notebooks from local directory: /gpfs/u/home/BMHR/BMHRkmkh/barn
[I 10:37:36.643 NotebookApp] The Jupyter Notebook is running at:
Display the WebGUI for a Jupyter notebook via Tunneling
Prerequisites
Jupyter notebook was started on the allocated compute node, such as dcs123. For how to see Start Jupyter Notebook.
SSH tunnelling on a Linux or MAC OSX node
Start the ssh session to one of the landing pad nodes and map the port 8888 from dcs123 to port 8888 on the local host. For example:
[id@kvt-rhel ~]$ ssh -L8888:dcs123:8888 BMHRkmkh@blp01.ccni.rpi.edu
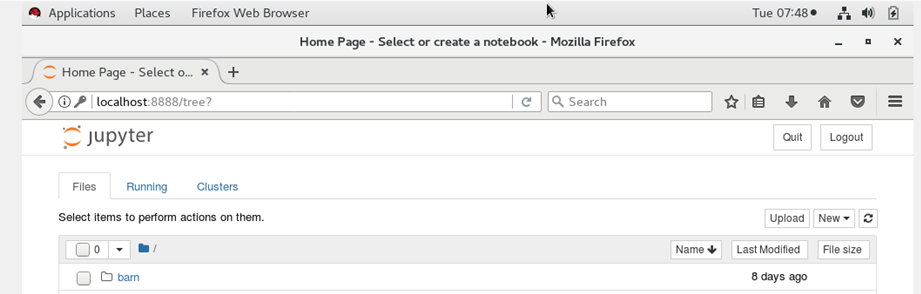
Go to your browser, enter the following to display the jupyter notebook running on the compute node dcs123.
http://localhost:8888
You should see the jupyter notebook after you enter the token at the login prompt.
SSH tunneling via PUTTY on Windows
Go to the “Change Setting…” of the current putty session, then go to section “Connection->SSH->Tunnels”.
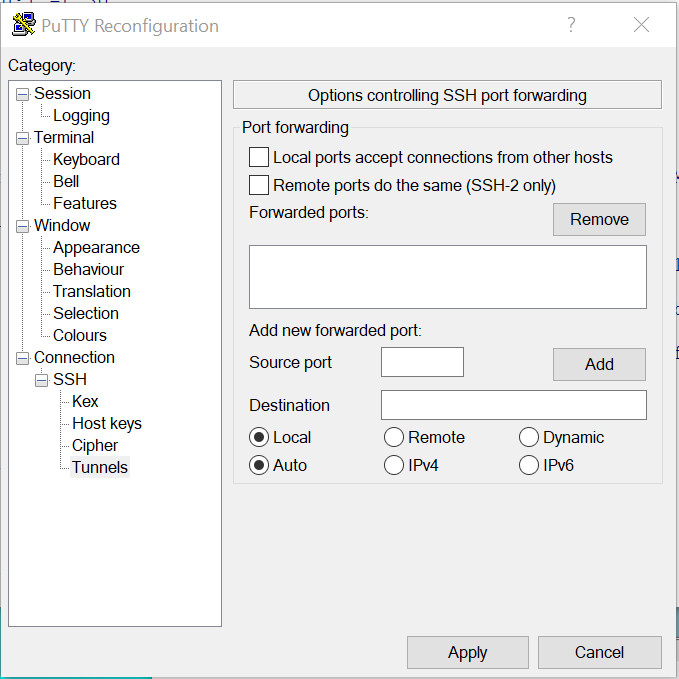
Enter the jupyter notebok URL on the compute node and click Add button to add.
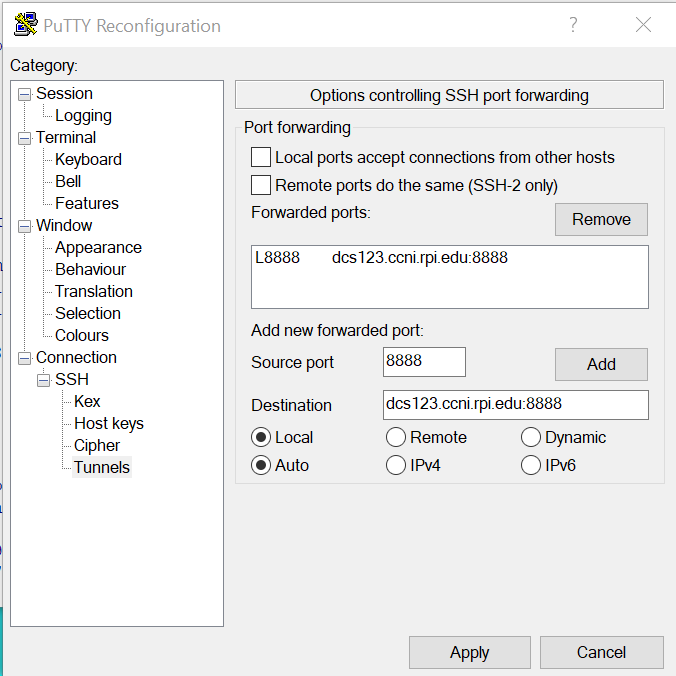
Click “Apply” button to apply the change the putty session.
NOTE: this is a temporary change setting to the putty session. Once you terminate the putty session, the change will go away.
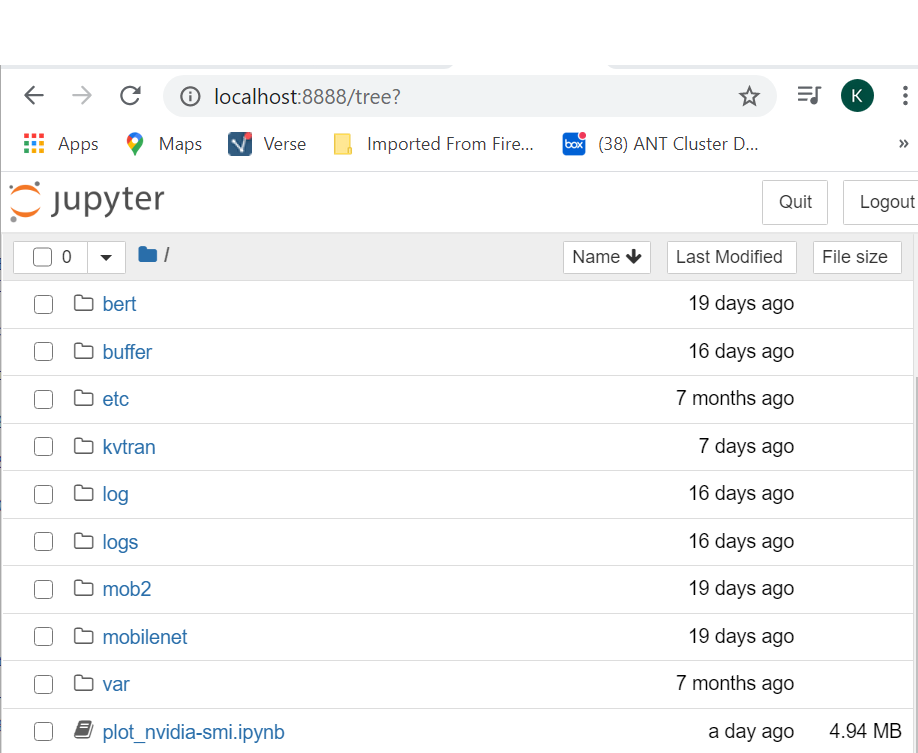
Now go to your browser and enter the following to tunnel to the jupyter notebook running on the compute node.
http://localhost:8888
You should see the jupyter notebook after you enter the token at the login prompt.
Remote Port Forwarding via SSH Tunneling
Let’s say that you have an application running on your local environment to which a process running on AiMOS needs to send a message. In order to accomplish that, you need to use SSH remote port forwarding and socat command.
For demonstration purpose, we are going to use the sample python code “echo-server.py” and “echo-client.py” provided at this link
On the local system
Run “echo-server.py”.
Run the ssh remote port forwarding command:
ssh -T -N -R :65432:localhost:65432 <your user ID>@blp01.ccni.rpi.edu
On the allocated compute node.
Run socat command to forward data from port 65432 to blp01 at port 65432, such as:
socat tcp-listen:65432,reuseaddr,fork tcp:blp01:65432
Run the “echo_client.py”.